Email Sending Integration
Overview
With HeiChat's Email integration, you can continue conversations after customers leave your website by sending follow-up emails, support replies, and conversion reminders through email.
This is especially useful for scenarios like:
- Following up with high-intent visitors after they leave your site
- Replying to visitors who shared their email address
- Sending order, shipping, or product-related follow-ups after a support conversation
- Managing on-site chat and email communication in one workflow
Before You Start
Before configuring email sending, make sure:
- You are already collecting customer email addresses in HeiChat
- You have an email account or email service provider that supports SMTP sending
- You know the SMTP host, port, encryption method, and login credentials required by your provider
- If your mailbox uses two-factor authentication, you will usually need an App Password instead of your normal login password
Step 1: Collect customer email addresses first
To use email follow-up, you first need to collect customer email addresses through the pre-chat form.
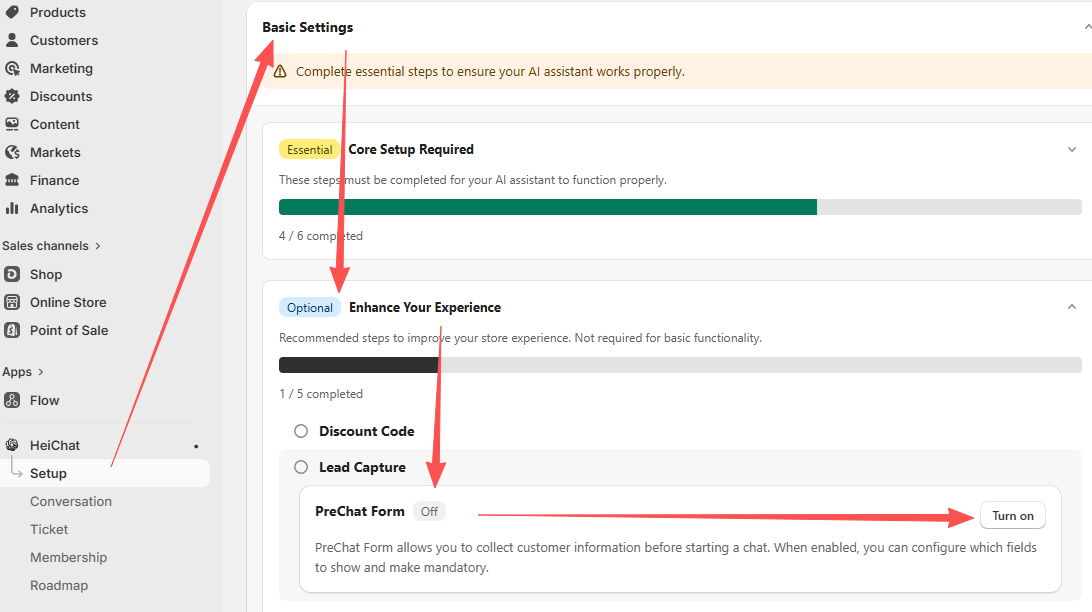
- Go to Setup → Basic Settings → Lead Capture
- Enable Pre-chat Form
- Make sure the form includes an email field
Once customers provide their email before starting a conversation, you can continue the conversation later through email.
Configure Email Sending in HeiChat
Go to Setup → Integrations → Email(Beta) and you will see a configuration screen like this:
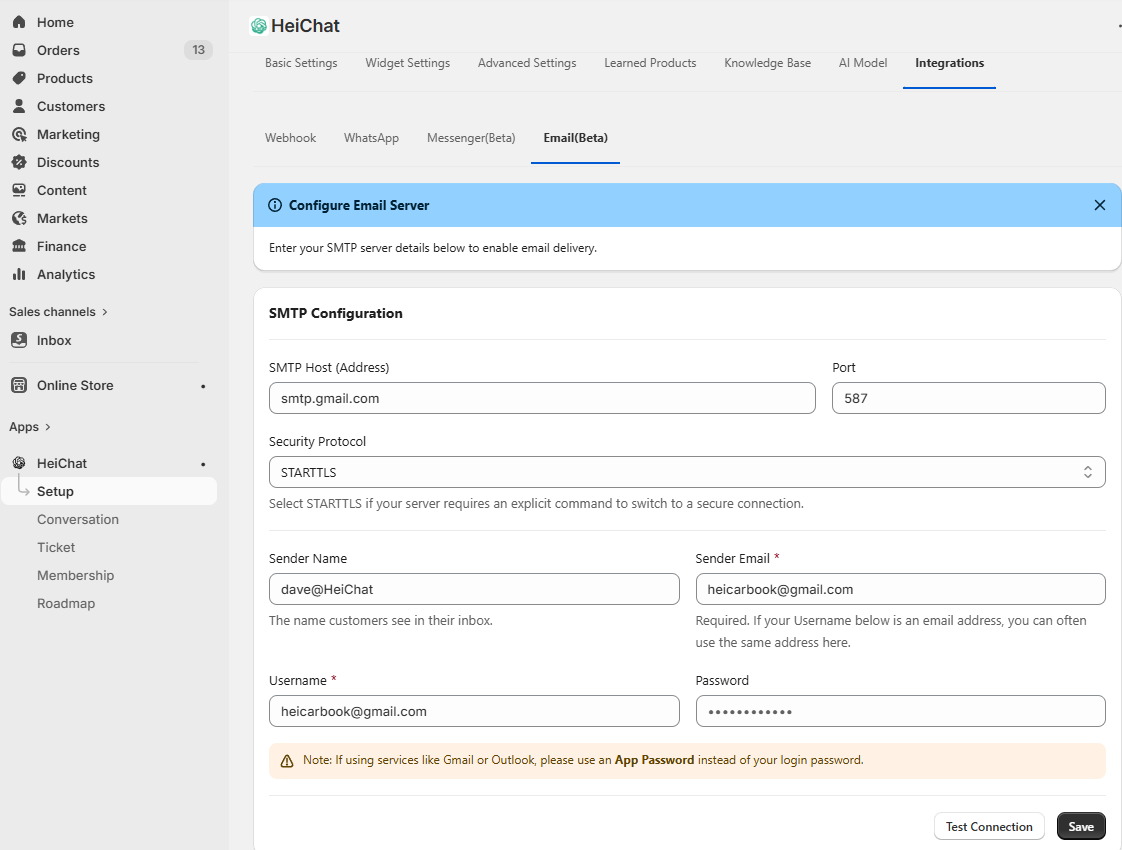
Fill in the following fields:
1. SMTP Host (Address)
Enter the SMTP server address provided by your email provider, for example:
smtp.gmail.comsmtp.office365.comsmtp.zoho.comsmtp.sendgrid.net
2. Port
Common ports include:
587: usually used withSTARTTLS465: usually used withSSL/TLS
If your provider does not say otherwise, start with 587 + STARTTLS.
3. Security Protocol
Choose the security protocol required by your provider:
STARTTLS: starts as a normal connection, then upgrades to an encrypted connection; this is the most common optionSSL/TLS: encrypts the connection immediately; commonly used with port465
4. Sender Name
This is the sender name customers see in their inbox, for example:
HeiChat SupportBrand Customer Care- Your store name
It is best to use your brand name or support team name here so customers can recognize the sender more easily.
5. Sender Email
This is the email address customers see as the sender. Recommended practice:
- Use a business email address that matches your store domain, such as
support@yourstore.com - Keep it the same as
Usernamewhen possible, because some providers may reject messages otherwise
6. Username
This is the SMTP login username. In most cases, providers expect the full email address, such as:
yourname@gmail.comsupport@yourstore.com
In most setups, Username and Sender Email are the same, and both use an email address format.
However, there are exceptions:
- Some providers do not use an email address as the SMTP username
- Some providers use a fixed username, a system-generated username, or an API-style username
- In those cases,
Sender EmailandUsernamewill be different
Examples:
- Gmail / Outlook / Zoho:
Usernameis usually the email address and is often the same asSender Email - SendGrid:
Usernameis usuallyapikey, whileSender Emailis still your actual sender address - Amazon SES / Mailgun:
Usernameis often a generated SMTP username and may not look like an email address
You can think of them like this:
Sender Email: the email address customers see as the senderUsername: the login account HeiChat uses to connect to the SMTP server
If your provider does not give special instructions, it is safest to keep them the same. If your provider gives you a separate SMTP username, use that value for Username.
7. Password
This is your SMTP login password. Please note:
- Gmail, Zoho, and similar providers often require an App Password when two-factor authentication is enabled
- Some Microsoft 365 / Outlook tenants require Authenticated SMTP to be enabled first
- Providers like SendGrid, Mailgun, and Amazon SES often use a dedicated SMTP password instead of the regular account password
8. Test Connection and Save
After filling everything in:
- Click Test Connection
- If the test succeeds, click Save
- Then send a real test email to confirm delivery, sender name, and inbox placement
Common Email Providers and SMTP Settings
Below are common setup patterns for several widely used mailbox and email service providers. Always follow the provider's official documentation if their requirements differ.
Gmail / Google Workspace
Good for low to medium sending volume and teams already using Google mailboxes.
- SMTP Host:
smtp.gmail.com - Port:
587 - Security Protocol:
STARTTLS - Sender Email: usually your current Gmail or Google Workspace email address, such as
support@yourstore.com; if you send from an alias, use an alias that is already configured in Gmail and allowed for sending - Username: full Gmail or Google Workspace email address
- Password: App Password
Notes:
- You must enable 2-Step Verification on the Google account first
- Then create an App Password for SMTP login
Sender Emailshould usually matchUsername; if it does not, make sure the alias has already been configured through Gmail or Google Workspace "Send mail as" settings- If you use Google Workspace and app passwords are restricted by org policy, your admin may need to allow them, or you may need to use Workspace SMTP Relay or a dedicated email service provider
References:
- Google Workspace: Send email from a printer, scanner, or app
- Google Account: Sign in with app passwords
Outlook / Microsoft 365
Good for teams already using Microsoft 365 business email.
- SMTP Host:
smtp.office365.com - Port:
587 - Security Protocol:
STARTTLS - Sender Email: usually your current Microsoft 365 mailbox address, such as
support@yourstore.com; if you want to send from a shared mailbox or alias, use that shared mailbox or alias address and make sure the account has permission to send as it - Username: full email address
- Password: mailbox password; if multi-factor authentication is enabled and the tenant allows it, an app password may be used
Notes:
- The mailbox must have Authenticated SMTP enabled
- If
Sender Emailis different fromUsername, make sure the alias, shared mailbox, or "Send As / Send on Behalf" permission is already configured - Some Microsoft 365 tenants disable SMTP AUTH, which can prevent classic username/password SMTP login from working
- If your tenant is strict, consider using a dedicated sending provider like SendGrid, Mailgun, Brevo, or Amazon SES instead
References:
- Microsoft 365: POP, IMAP, and SMTP settings
- Exchange Online: Enable or disable authenticated client SMTP submission
- Microsoft: Create app passwords from the Security info page
Zoho Mail
Good for small and medium-sized teams using business email for support and notification messages.
- SMTP Host:
smtp.zoho.com - Port:
587 - Security Protocol:
STARTTLS - Sender Email: usually your current Zoho mailbox address, such as
support@yourstore.com; if you use an organization alias or group address, use an address that already has sending permission in Zoho - Username: full Zoho email address
- Password: mailbox password or App-specific Password
Notes:
- If MFA is enabled, using an App-specific Password is recommended
- If
Sender Emailis not the primary mailbox address, make sure it has already been set up in Zoho as an allowed alias or sender identity - For better deliverability, configure SPF and DKIM for your sending domain
References:
SendGrid
Good for merchants who need more reliable transactional delivery for notifications, automation, and support follow-up.
- SMTP Host:
smtp.sendgrid.net - Port:
587 - Security Protocol:
STARTTLS - Sender Email: use a sender address that has already been verified in SendGrid, such as
support@yourstore.com; a branded domain email with Domain Authentication is strongly preferred - Username:
apikey - Password: the SendGrid API key you created
Notes:
- SendGrid's SMTP username is usually not an email address; it is commonly the fixed value
apikey Sender Emailcannot be arbitrary; it must be an address SendGrid allows you to send from, otherwise sending may fail if single sender verification or domain authentication is missing- Domain authentication is strongly recommended for better deliverability and branding
References:
Mailgun
Good for technical teams or merchants who want stronger control over transactional email routing, logs, and deliverability.
- SMTP Host: usually
smtp.mailgun.org - Port:
587 - Security Protocol:
STARTTLS - Sender Email: use an email address under your verified Mailgun sending domain, such as
support@mail.yourstore.comorsupport@yourstore.com, depending on how your sending domain is configured - Username: the SMTP username provided by Mailgun
- Password: the SMTP password provided by Mailgun
Notes:
- Different regions or account types may show different SMTP hostnames, so use the value shown in your Mailgun dashboard
Sender Emailshould belong to a domain you have verified in Mailgun; do not copy theUsernamehere because it is usually only the SMTP login account- It is best to send from a verified domain
References:
Amazon SES
Good for teams with some technical resources who care about cost efficiency and scalability.
- SMTP Host:
email-smtp.<region>.amazonaws.com - Port:
587 - Security Protocol:
STARTTLS - Sender Email: use a sender address that has already been verified in SES, or an address under a domain that has been verified in SES, such as
support@yourstore.com - Username: the SES-generated SMTP username
- Password: the SES-generated SMTP password
Notes:
- Replace
<region>with your SES region, such asus-east-1 - SES SMTP credentials are different from your AWS console login and must be created separately
Sender Emailmust match a verified SES identity; if you verified only a single email address, you can send only from that address, while a verified domain lets you use other addresses under that domain- If your SES account is still in sandbox mode, you can usually send only to verified addresses
References:
- Amazon SES: Connecting to an Amazon SES SMTP endpoint
- Amazon SES: Obtaining Amazon SES SMTP credentials
Brevo (formerly Sendinblue)
Good for small and medium-sized merchants that send both marketing and transactional email.
- SMTP Host:
smtp-relay.brevo.com - Port:
587 - Security Protocol:
STARTTLS - Sender Email: use a sender address that has already been added and verified in Brevo, such as
support@yourstore.com; a branded domain email with completed domain authentication is recommended - Username: your Brevo account email address
- Password: the SMTP key generated by Brevo
Notes:
- It is recommended to use Brevo's SMTP key rather than your regular login password
Sender Emailcan be different fromUsername, but it must first be verified in Brevo as an allowed sender, otherwise the message may be rejected- For branded sending, complete domain verification and sender authentication first
References:
Which Option Should I Choose?
If you are not sure which provider to use, here is a simple guide:
- Personal mailbox or small team trial: Gmail, Google Workspace, or Zoho Mail
- Already using business email: Microsoft 365 or Google Workspace
- Need strong deliverability and scalability: SendGrid, Mailgun, Amazon SES, or Brevo
- Planning long-term branded sending: use a domain-based business mailbox or a professional email service instead of a free personal mailbox
If your use case combines support follow-up, order notifications, and marketing communication, a professional email service is usually more stable than a free mailbox and gives you better control over deliverability, bounces, and domain authentication.
Troubleshooting
1. Test connection fails
Check these items first:
- The SMTP host is correct
- The port matches the encryption method, such as
587 + STARTTLS - The username is correct and complete
- Whether the password should instead be an app password or SMTP password
- The provider allows third-party SMTP login
2. Authentication failed
Common causes include:
- Two-factor authentication is enabled, but you are still using the normal login password
- Authenticated SMTP is not enabled for the Microsoft 365 mailbox
- You used the normal account password for SendGrid, SES, or Mailgun instead of the SMTP credential
3. Messages are sent but land in spam
Check the following:
- SPF, DKIM, and DMARC are configured for your sending domain
- The sender name is clear and trustworthy
- You are not using a free personal mailbox for heavy business sending
- Your content does not look excessively promotional or spammy
4. Can Sender Email and Username be different?
Yes.
For most standard mailbox providers:
Sender EmailandUsernameare usually the same- Both are often full email addresses
For some professional sending services:
Usernamemay not be an email addressSender Emailis still the visible sender address
Examples:
- SendGrid:
Username = apikey - Amazon SES:
Username = SES-generated SMTP username - Mailgun:
Username = Mailgun-provided SMTP username
Many providers validate the sender address strictly. To reduce the chance of failure, it is best to keep:
Sender Email = Username
unless your provider explicitly gives you a separate SMTP username.
If your provider requires a non-email SMTP username, make sure:
Sender Emailis an allowed sender address or a verified sender identity- your domain, alias, or sender identity has already been verified
If you want to send from an alias, first confirm that the provider supports aliases or verified sender addresses.
Best Practices
- Use a domain-based business email instead of a free personal mailbox whenever possible
- Configure SPF, DKIM, and DMARC for your sending domain
- Send a real test email instead of relying only on a successful connection test
- Start with a small sending volume, then scale up gradually
- If you send larger volumes, use a professional transactional email provider
Need Help?
If you run into any issues while configuring HeiChat Email integration, contact the HeiChat support team at heicarbook@gmail.com